Annotation Guide
This guide is the annotator-facing reference for marking up accelerometry recordings of the NSHAP Round 4 physical-function tests: Chair Stand, 3-Meter Usual Walk, Timed Up and Go (TUG), and the 6-Minute Walk Test (6MWT). It covers what to look for in the signal, where to start and stop each annotation, and how to handle common edge cases.
Definitions
Term |
Meaning |
|---|---|
Annotation |
A time range marked on the recording, with one or more labels applied to it. |
Episode |
The full duration of one performance-test attempt, including warm-up, false starts, and recovery. |
Score |
The clean section of the episode used to time the participant. |
Segment |
An individual repetition or sub-section within an episode (e.g. one of the five sit-to-stand cycles). |
Dominant stride |
A stride from the leg on the same side as the accelerometer. |
Non-dominant stride |
A stride from the opposite leg. |
How the app’s labels map to Episode / Score / Segment
The app stores every annotation as a time range plus an artifact label (the test type) and up to three flags (segment, scoring, review). The three annotation types from the NSHAP guide map onto this as follows:
NSHAP guide term |
What you do in the app |
|---|---|
Episode |
Box-select the range, click the test button ( |
Score |
On a fresh annotation of the same range, click the test button, then click Scoring. |
Segment |
On a fresh annotation of the sub-range, click the test button, then click Segment. |
Flag for review |
Click Review on any annotation that needs a second pair of eyes. Add a note explaining why. |
Flags are toggles. Clicking the same button again removes that flag. An annotation can carry more than one flag at a time (e.g. the scoring segment also flagged for review).
Workflow
Select your name in the “Annotate as” picker and open the participant’s HDF5 file.
Position the time window at the start of the file. For most tests the relevant signal lives in the first hour; for the 6MWT you’ll need to navigate by time using the activity log.
Box-select the episode by left-click-dragging across the disturbance. The box has no fill until you apply the first label.
Click the test button (
Chairstand,TUG,3m Walk,6min Walk). The annotation becomes a colored overlay.Add score and segment annotations by box-selecting the relevant sub-range and clicking the test button again, then the appropriate flag.
Flag for review anything ambiguous and write a note explaining the concern.
Click Export to write annotations to disk. The app does not auto-save.
Delete an annotation by box-selecting fully around it (check “Selected annotations” lists the right one) and clicking Delete, then Export.
Activity types and overlay colors
Activity |
Color |
What it measures |
|---|---|---|
Chair Stand |
Cyan |
Lower-extremity strength via five sit-to-stand cycles |
TUG |
Yellow |
Functional mobility — stand, walk 3 m, turn, walk back, sit |
3-Meter Walk |
Magenta |
Short-distance gait speed |
6-Minute Walk |
Green |
Submaximal aerobic capacity |
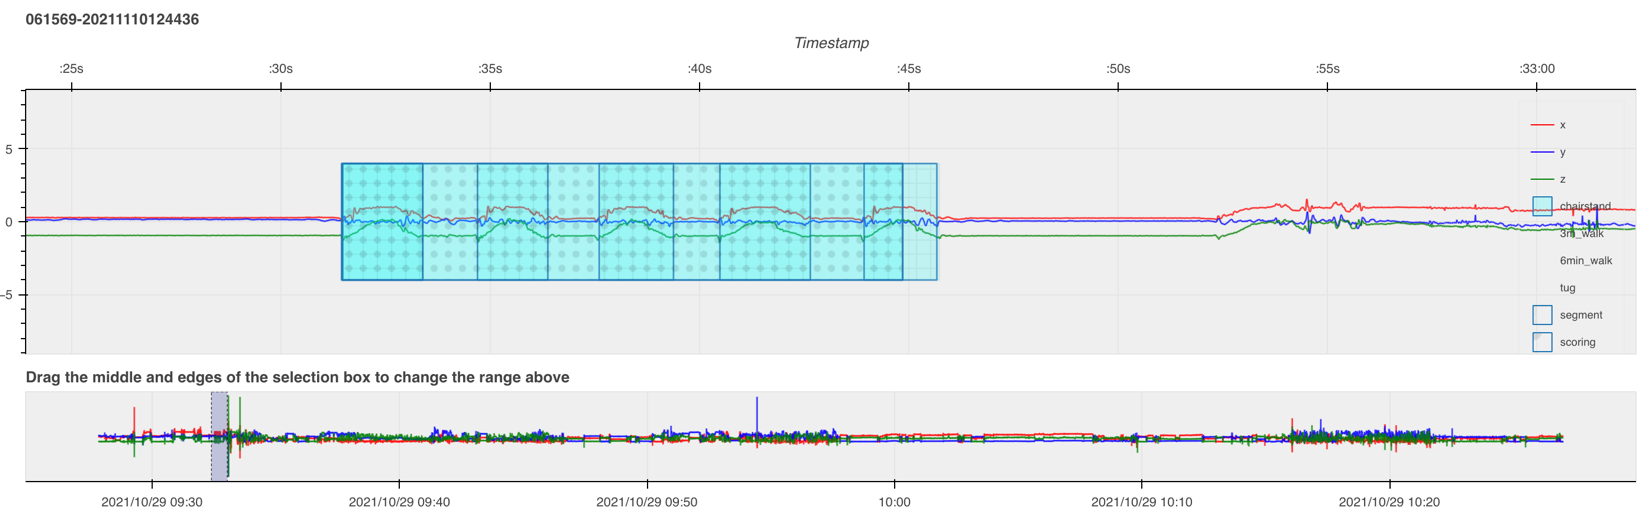
Chair Stand Test
The signal shows five distinct waves where all three axes diverge from the flat baseline, separated by brief returns to baseline. Each wave is one sit-to-stand-to-sit cycle. The large amplitude reflects the thigh rotating roughly 90° between sitting and standing.
Episode
Start: the first disturbance from flat — all three axes diverge.
Stop: the last disturbance before flat returns — two of the three axes converge to the same count level.
Label:
Chairstand.
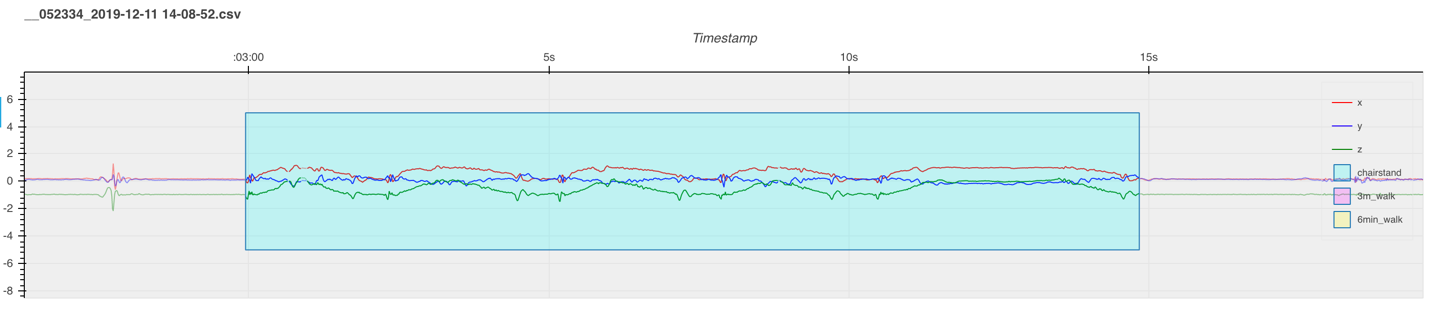
Score
Start: the first disturbance from flat — all three axes diverge.
Stop: the mid-peak of the 5th chair-stand wave.
Label:
Chairstand+ Scoring.The participant must have completed at least 5 chair stands to be scored. If fewer than 5 are completed, skip the score. If more than 5, score the first 5.
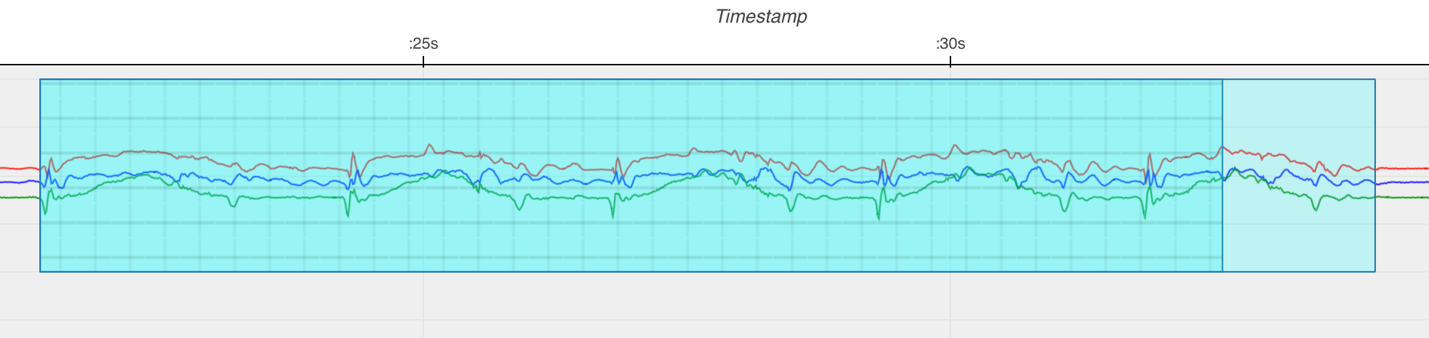
Segments
Annotate every chair stand, even past 5.
Start: the rise of each chair stand — all three axes diverge.
Stop: the end of the sit — two of the three axes converge.
Label:
Chairstand+ Segment.
Common issues
Fewer than 5 chair stands. Annotate the episode and each segment, but do not score.
More than 5 chair stands. Episode covers all attempts; score the first 5 only; segments cover every attempted stand.
Multiple 5-rep attempts. One episode covers everything. Add a separate score per attempt and a separate segment per stand.
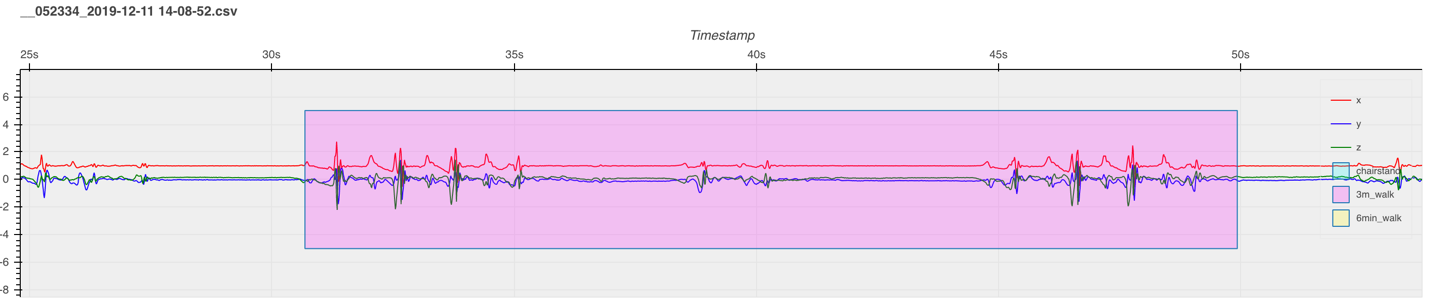
3-Meter Usual Walk
After the initial stand, look for this sequence: ~5 s flat → walk 1 (3–25 s of steps) → flat → short step (turnaround) → flat → walk 2 → ~5 s flat.
Episode
Start: the inflection from rest to the first motion on any axis, before walk 1.
Stop: the inflection from the last motion on any axis at the end of walk 2 back to flat.
Label:
3m Walk.
Score
Each walk has alternating dominant and non-dominant strides. Each step typically shows two “M”-shaped movements along one axis; amplitude differences tell you which is which. Zoom in for clarity.
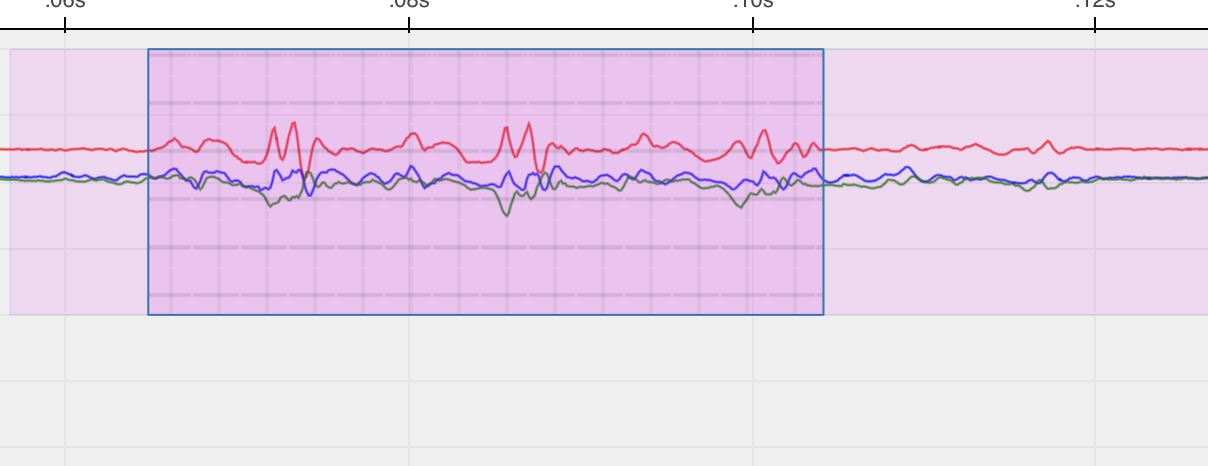
Start: the inflection from rest to the first full-swing step on all three axes.
Stop: the base of the final full-swing step. A full-swing step has amplitude similar to the prior steps (>50 % of their height). A half-amplitude step is not a full swing.
The X and Z axes diverge in opposite directions on each stride and return to baseline (Z hits 0) at the stride’s end.
Label:
3m Walk+ Scoring.

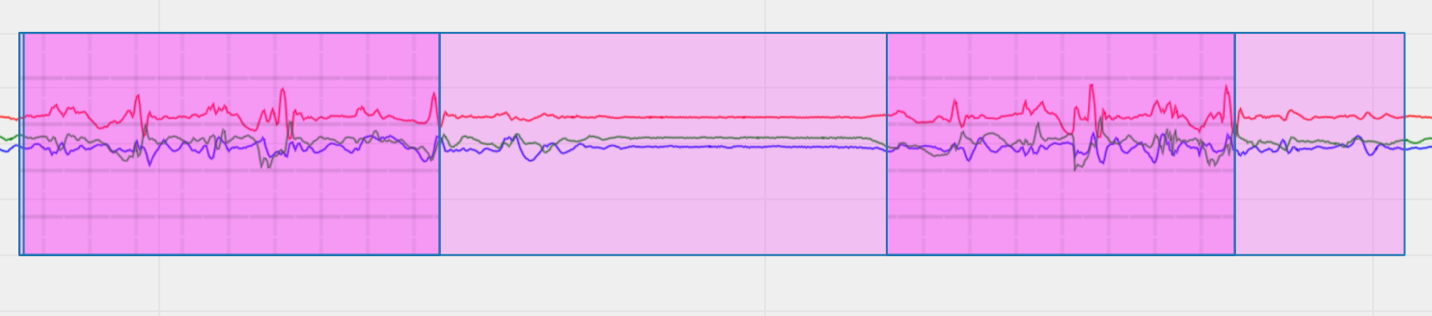
Segments
None. The 3 m walk doesn’t use segment annotations.
Common issues
More than 2 walks. Include all attempts in the episode. Score each individual walk.
No pause before turnaround. When the turn flows directly into the next walk, use stride pattern and count to identify the boundary — each walk should have a similar number of strides.
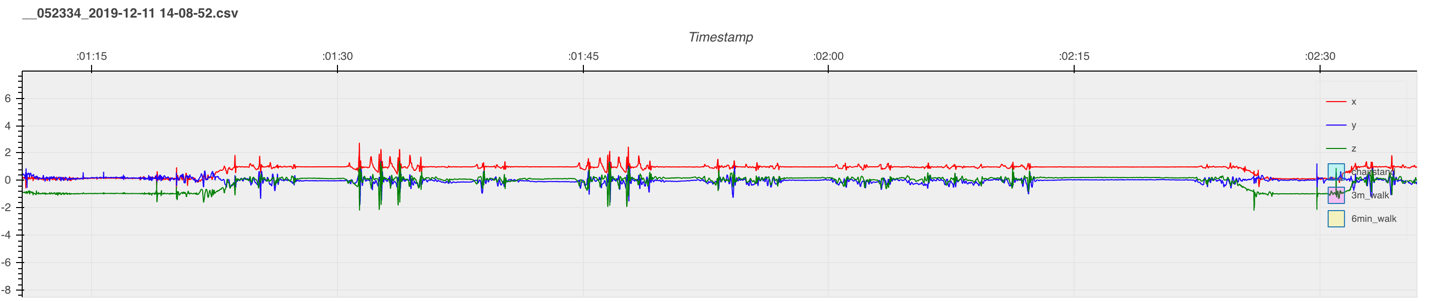
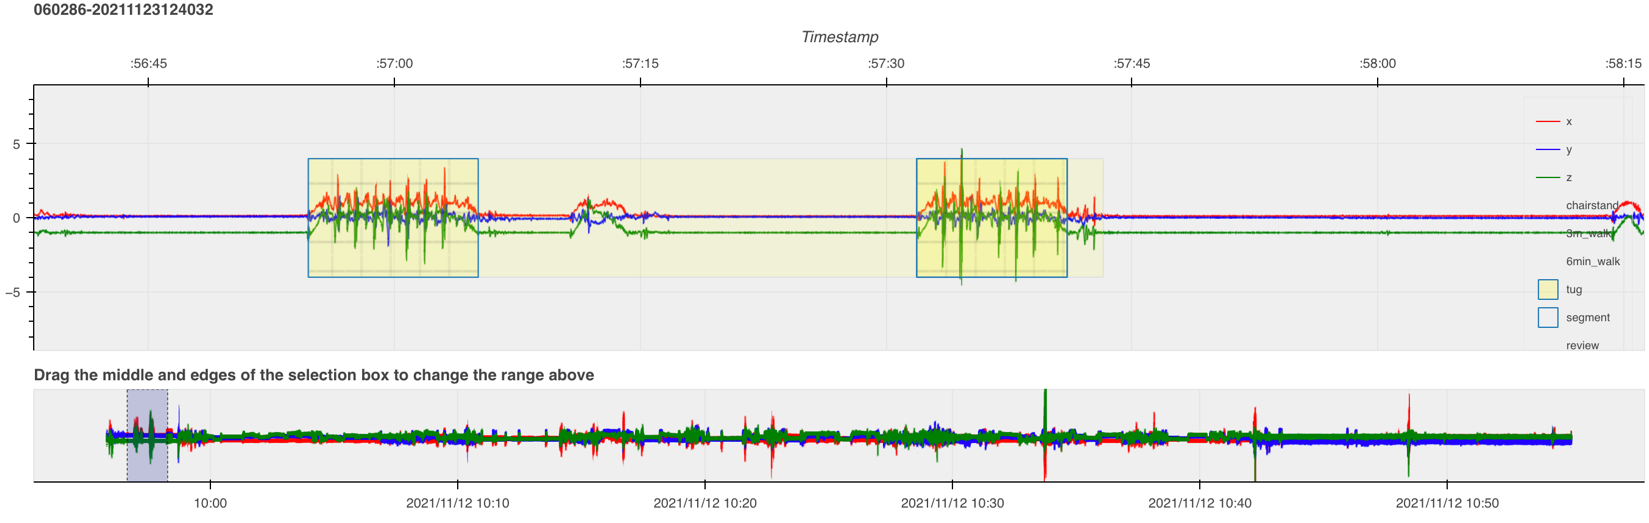
Timed Up and Go (TUG)
A composite test: chair rise (one large burst) → walk out (regular oscillations) → turn (brief disrupted rhythm with reduced amplitude) → walk back → chair sit (another large burst).
Episode
Start: the first disturbance from flat — all three axes diverge.
Stop: the last disturbance before flat returns — two of three axes converge.
Label:
TUG.
Score
Start: the first disturbance — all three axes diverge.
Stop: the end of the chair sit — two of three axes converge.
Label:
TUG+ Scoring.
(The score and episode often share start/stop points for TUG; the score formalizes the timed portion.)
Segment
Mark the walking portion only — exclude the chair rise and chair sit.
Start: the first step after rising. The top axis (usually red, when the device is placed correctly) is the clearest reference.
Stop: immediately after the last step, before the descent into the chair.
Label:
TUG+ Segment.
Common issues
More than one TUG attempt. Single episode covers everything; one score per attempt.
Pauses mid-TUG. Episode and score follow the standard rules. For segments, split the walking portion into two segments if the pause falls mid-walk; otherwise use one segment that excludes the pause.
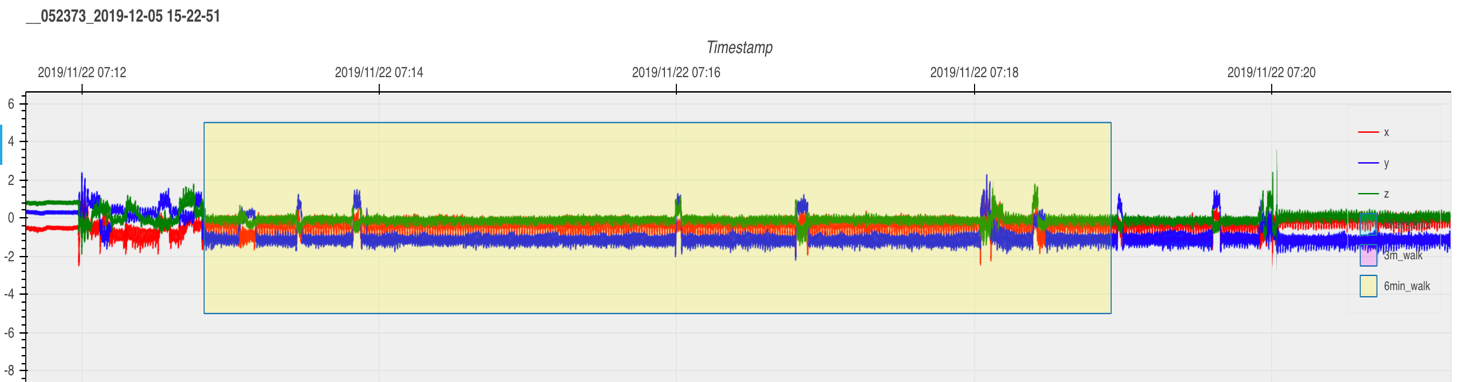
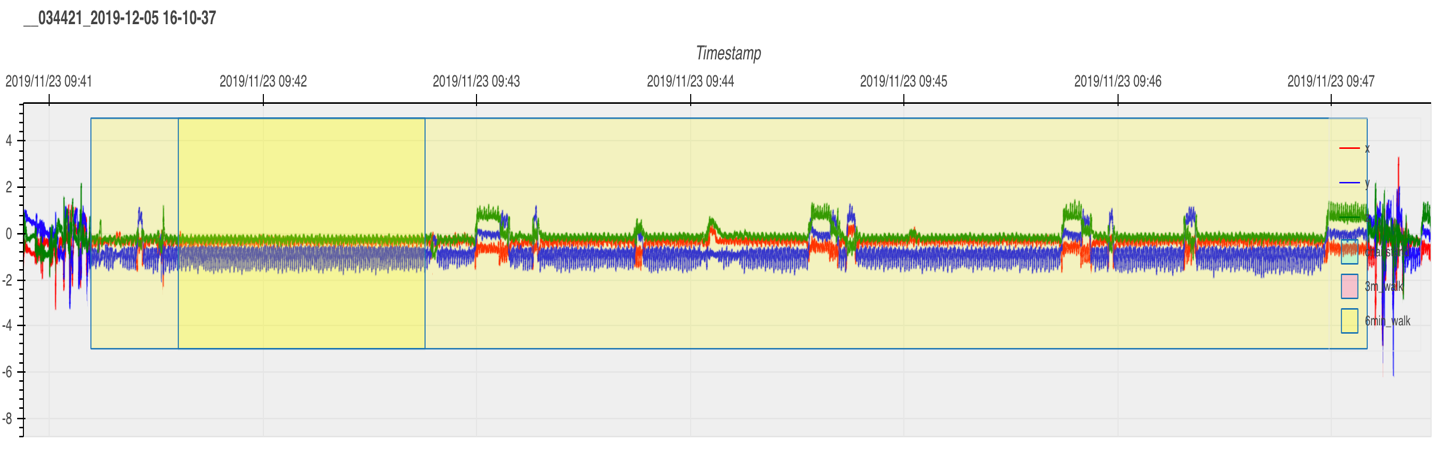
6-Minute Walk Test
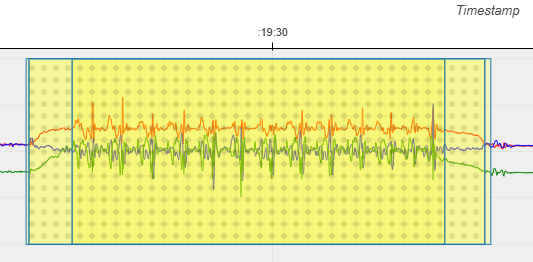
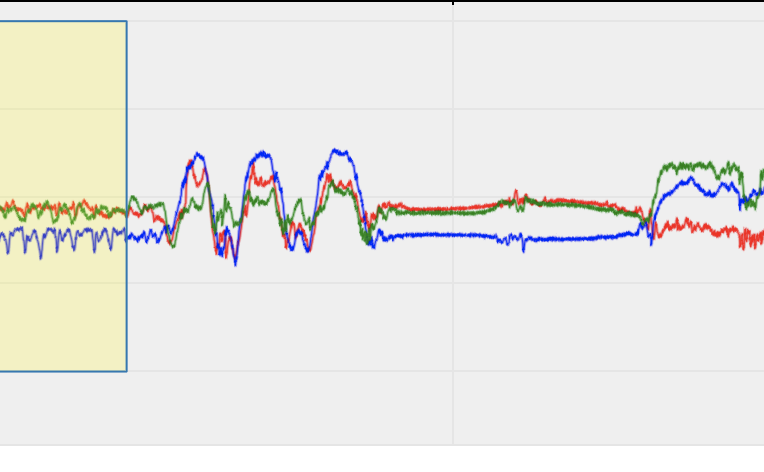
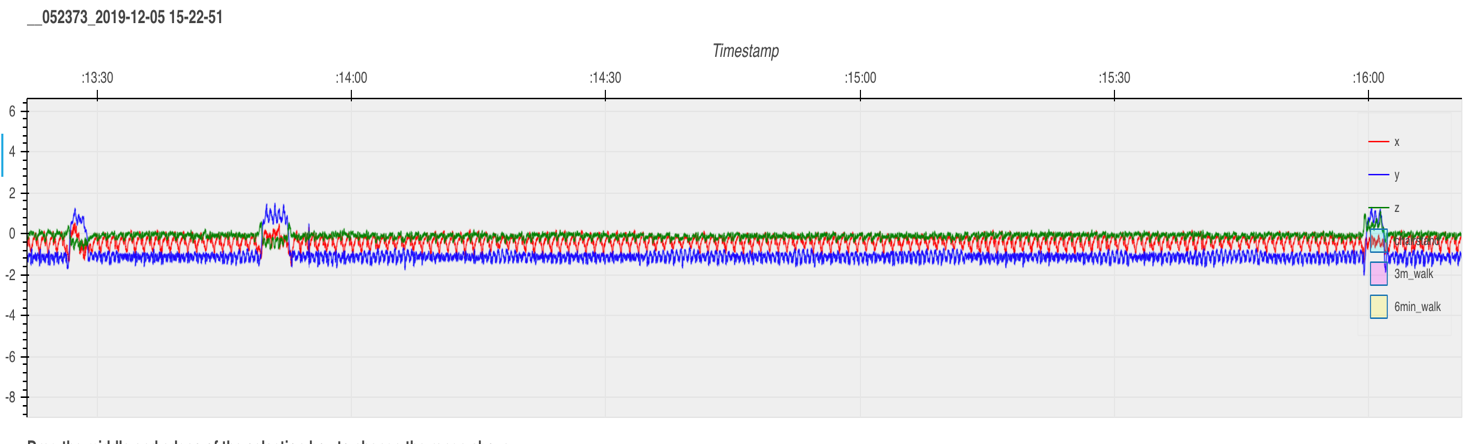
The 6MWT has a distinctive boundary marker: participants do a “hand wave” before and after the walk. The wave shows up as a clean sinusoidal pattern in the north-south direction. The walk itself is sustained rhythmic stepping for around 6 minutes; participants may walk slightly more or less.
Finding the 6MWT in the recording
Look up the date and time of the test in the sleep/activity log (cross-reference by
su_idand device serial).Position the time window at the start of that day.
Set windowsize to 14400 (4-hour frames) and step through with Next.
Look for the sinusoidal hand-wave pattern that brackets the walk.
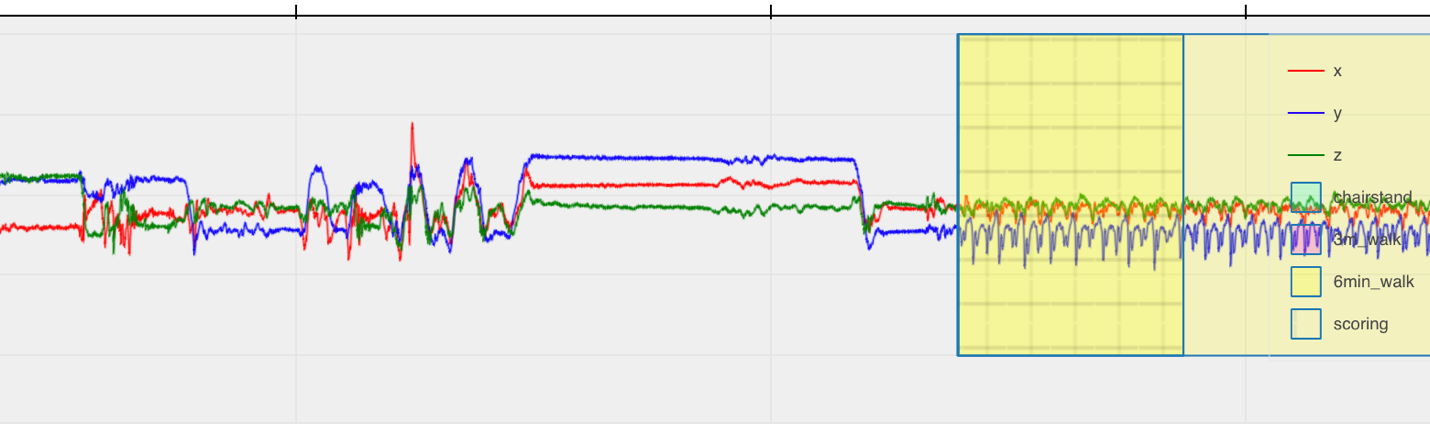
Episode
The walking pattern between the two hand waves shows rapid, repeated arm-swing waves.
Start: the first repeated rapid arm-swing wave (just after the opening hand wave).
Stop: the end of the walking pattern, just before the closing hand wave.
Label:
6min Walk.Device rotation on the wrist can shift which axes show the pattern.
Score (10-second segment)
Pick any clean 10-second stretch of continuous walking with no breaks, pauses, turns, or device rotation if possible.
Start: any point near the beginning of a clean walk stretch.
Stop: ≥ 10 s later, still in the clean walk.
Label:
6min Walk+ Scoring.Longer than 10 s is fine.
Segments
None. The 6MWT doesn’t use segment annotations.
Vector magnitude overlay
The plot can show a fourth trace, vector magnitude (VM = √(x² + y² + z²)), as a black line. VM is orientation-independent. Rotating the sensor doesn’t change it, so periodic motion shows up as a clean oscillation around 1 g and impacts show up as sharp spikes. Toggle it on or off by clicking VM in the plot’s legend.
VM is useful for:
Spotting where activity starts and ends without having to fuse three axes by eye.
Counting reps. Each sit-to-stand bump or footfall is one VM peak.
Sanity checks. A long flat near 1 g means the device sat still; a flat near 0 g means a sensor fault or data gap.
Automated walking detection
The Walking detection panel in the sidebar runs a sustained-harmonic-walking detector (based on Urbanek et al. 2015) on the whole file. Candidates appear as dashed orange overlays on the plot. They are suggestions, not labels.
Click Detect walking to scan the file. Results are saved to
data/output/walking_suggestions.xlsxand survive page refresh.The list under the button shows every candidate with time, duration, and step frequency. Click a row to jump the time window to that segment.
Click the ✕ next to a row to dismiss it. Dismissed rows turn red, leave the plot overlay, and get flagged
deleted=Truein the xlsx. Clicking ✕ again reinstates them.To convert a suggestion into a real annotation, box-select over the highlighted region and click
3m Walkor6min Walkas you would for any manual annotation.Clear hides the current session’s list and overlay without touching the xlsx.
Annotation export format
Annotations are written to data/output/annotations_<username>.xlsx on click of Export. One row per annotation:
Column |
Type |
Description |
|---|---|---|
|
string |
Source HDF5 filename |
|
string |
Activity type ( |
|
bool |
Segment flag |
|
bool |
Scoring flag |
|
bool |
Review flag |
|
float |
Start time as Unix epoch (seconds) |
|
float |
End time |
|
string |
Start time formatted as text |
|
string |
End time formatted as text |
|
string |
When this row was written |
|
string |
Annotator username |
|
string |
Free-text note |
Walking-detection results are written to data/output/walking_suggestions.xlsx (shared across users; one row per detected segment, with a deleted column for dismissals).
Tips
Start with a wide window (e.g. 3600 s) to find episodes, then zoom in to annotate.
Use the range-selector minimap to scrub long recordings.
Annotate one test type across the whole file before moving to the next — keeps your eye calibrated.
Export often. Closing the tab without exporting loses your work.
When you’re not sure, flag for review and move on. A flag is faster and more reliable than a guess.